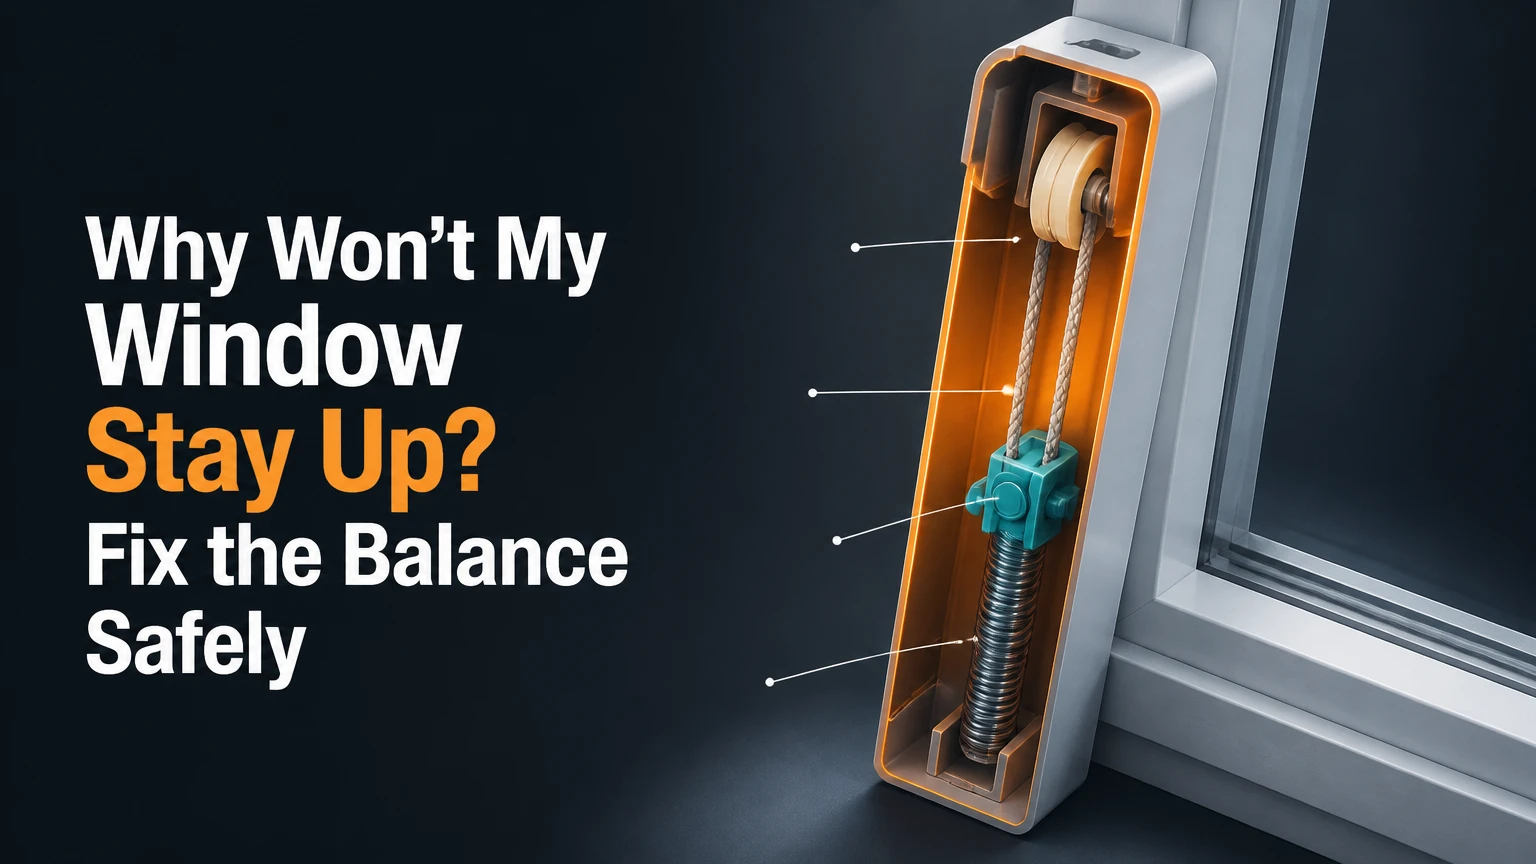
Why Won’t My Window Stay Up? Fix the Balance Safely
A window that will not stay open usually has a failed or disconnected window balance, the counterweight mechanism that supports the movable sash. Other causes include a broken pivot bar, a tilted balance shoe, excessive track friction, paint seizure, or a sash that was reinstalled incorrectly. Identify the failure before ordering parts.
Key Facts at a Glance
- A failed window balance usually makes a double-hung sash fall, drift downward, or feel unusually heavy.
- Modern vinyl windows commonly use constant-force, spiral, or block-and-tackle balances.
- A replacement balance must match the window’s manufacturer, sash weight, channel length, shoe design, and weight code.
- Typical DIY repair time is 20-40 minutes after the correct part arrives.
- Typical USA balance repair costs are $15-$40 for DIY parts and $125-$250 for professional service.
- A cracked frame, failed insulated glass unit, or severely corroded sash can justify full window replacement, but a failed balance alone usually does not.
Why Won’t My Window Stay Up?
A window sash falls because the upward force from its balance system no longer offsets the sash’s downward weight. The most common failure is a snapped spring, frayed cord, disconnected balance shoe, or balance that has lost its tension.
The sash may still move normally for part of its travel, which can mislead homeowners. A balance can lose support gradually, causing the window to stay open at the top but slide down several inches after vibration. A completely failed balance makes the sash feel heavy and often produces a sudden drop.
Other faults mimic balance failure. A broken pivot bar can prevent the sash from engaging the shoes, while a dirty or swollen jamb can increase friction enough to make operation unsafe. Paint around an old wood sash can also hold the window in a position, then release suddenly.
Is the balance really the problem?
Test the sash with both hands while keeping your face and fingers outside the closing path. If the sash feels significantly heavier than usual, falls immediately, or has one loose side, the balance system is the leading suspect. If the sash feels evenly supported but binds at one point, inspect the track and frame before replacing hardware.
A window that drops on one side has a different diagnosis from a window that falls evenly. One-sided dropping often indicates a disconnected shoe, broken cord, damaged pivot bar, or a balance installed on only one side.
How Does a Window Balance Work?
A window balance counteracts the weight of a movable sash through a spring, pulley, cord, or concealed weight. When the balance is correctly matched, the sash requires moderate hand force to move and remains at an open position without a prop.
The mechanism does not lift the glass independently. It shares the load with the person operating the window. A double-pane vinyl sash may weigh roughly 12-28 pounds, while larger wood or triple-glazed sashes can weigh considerably more.
A correctly balanced sash has a near-neutral load through its normal travel. Too little balance force causes downward drift. Too much force can make the sash rise aggressively, interfere with the lock, or stress the pivot hardware.
Balance force and sash weight
Manufacturers use weight codes, spring ratings, or balance numbers to match hardware to a sash. The same-looking channel can support different loads, so measuring only the visible metal length is not enough.
A practical test is to weigh the removed sash on a bathroom scale, subtracting the scale platform weight if necessary. Divide the target load between the two sides when the supplier specifies a per-balance rating. Do not assume that every stamped number represents pounds; some numbers identify a series, date, length, or manufacturer code.
Which Balance System Does Your Window Use?
The four common systems are spiral, constant-force, block-and-tackle, and sash cord with weights. Frame material and window age provide clues, but the mechanism inside the jamb determines the repair method.
| Balance type | Typical window | Visible clue | Typical service life | Repair approach |
|---|---|---|---|---|
| Spiral balance | Older vinyl or aluminum | Spiral metal rod near sash bottom | 10-15 years | Retension or replace |
| Constant-force balance | Modern vinyl tilt window | Coiled steel tape inside shoe | 15-20 years | Replace assembly |
| Block-and-tackle balance | Vinyl, wood, premium aluminum | Metal channel with cord and pulleys | 10-15 years | Replace matched channel |
| Sash cord and weight | Historic wood double-hung | Rope, pulley, and wall-pocket weight | 50-100+ years | Re-rope or replace chain |
Spiral balances
A spiral balance uses a spring inside a tube and a spiral rod that engages the sash shoe. Older aluminum and vinyl windows often use this design.
Typical failure signs include a rod that spins freely, a rod hanging below the sash, or a sash that suddenly becomes heavy after a snapping sound. Some spiral balances can be retensioned, but a weak, corroded, or bent spring usually needs replacement.
Constant-force balances
A constant-force balance uses a coiled stainless-steel spring strip. The spring sits in a housing or shoe and supplies near-consistent lift through the sash’s travel.
The plastic shoe can crack, the spring can rust or detach, and the mounting point can pull loose. Constant-force assemblies are generally replaced rather than adjusted because the spring rating is fixed.
Block-and-tackle balances
A block-and-tackle balance combines an extension spring with nylon pulleys and a cord inside a metal channel. The pulley arrangement multiplies the spring’s effective lifting force.
A frayed cord, broken pulley, detached hook, or bent channel can stop the balance from supporting the sash. The stamped weight code matters particularly with this design because similar channels may have different spring capacities.
Sash cords and weights
Historic wood windows often use cotton or synthetic sash cord connected to a cast-iron or lead weight inside the wall cavity. The cord passes over a pulley and balances the sash through direct counterweight.
A snapped cord leaves the weight at the bottom of the pocket and makes the sash heavy. Re-cording preserves the original window, but the work involves removing stops, accessing the weight pockets, and safely securing the sash.
What Should You Inspect First?
Inspect the sash, pivot hardware, jamb tracks, and balance attachment before removing anything. The first inspection takes about 5-10 minutes and can distinguish a disconnected component from a worn balance.
| Observation | Most likely cause | Confirmation | Usual remedy |
|---|---|---|---|
| Sash drops evenly | Failed balances | Sash is heavy on both sides | Replace or retension balances |
| Left side drops first | One balance or shoe disconnected | One rod, cord, or shoe looks loose | Reconnect or replace matched side |
| Sash tilts crookedly | Pivot bar or shoe problem | Pivot pin is bent or not seated | Replace pivot hardware |
| Window binds at one point | Dirty, swollen, or damaged jamb | Rub marks or debris in track | Clean, repair, or adjust track |
| Rod spins freely | Spiral balance lost engagement | Spiral tip does not grip shoe | Retension or replace |
| Cord hangs loose | Broken sash cord or balance cord | Cord end is detached | Re-cord or replace channel |
| Plastic fragments appear | Cracked balance shoe | Broken shoe at track bottom | Replace shoe or balance assembly |
Open the window only as far as needed for inspection. Look for broken plastic, loose screws, pulled-out anchors, frayed cord, rust, and a sash that is not level. Do not put fingers beneath an unsupported sash.
Inspect pivot bars on tilt-in windows
Tilt the sash only if the latches and hardware operate normally. The metal pivot bars at the lower sash corners must sit fully inside the balance shoes. A stripped screw hole or bent bar can leave one side unsupported even when the balances remain intact.
If the sash was recently removed for cleaning, incorrect reinstallation is a strong possibility. The pivot bars may be resting beside the shoes rather than inside their locking cams.
Check friction before replacing hardware
A dirty track can increase opening force without causing the sash to fall. Vacuum loose grit, wipe the jamb with a damp cloth, and use only a manufacturer-approved silicone or dry lubricant where appropriate.
Avoid petroleum grease in vinyl balance tracks. Grease attracts dust and can make the shoes slide unpredictably. If cleaning changes operation substantially, the balance may still be serviceable.
Can You Adjust the Balance Instead of Replacing It?
You can sometimes adjust a spiral balance, but constant-force and most block-and-tackle balances usually require replacement when their spring or cord has failed. Adjustment is appropriate only when the rod, shoe, spring, and mounting points remain intact.
Spiral balances are adjusted with a dedicated tension tool. The technician supports the sash, engages the rod, adds small tension increments, and tests the sash after each adjustment. A typical correction may involve two or three turns, but the correct amount depends on the sash and balance design.
Never use ordinary pliers on a spiral rod. If the tool slips, stored spring energy can injure fingers or damage the glass. Stop when the rod is bent, rusted, disconnected, or unable to hold tension.
A constant-force spring that has slipped or snapped is not reliably restored by bending the tape. Replacing the complete assembly is safer and more predictable.
How Do You Replace a Balance in a Tilt-In Window?
A typical tilt-in balance replacement takes 20-40 minutes per window and requires a screwdriver, gloves, a stable work surface, and the correctly matched replacement pair. The sash must be supported throughout removal, and the exact take-out procedure varies by manufacturer.
Before You Start
| Requirement | Typical value | Why it matters |
|---|---|---|
| Repair time | 20-40 minutes | Excludes part-shipping time |
| DIY parts cost | $15-$40 | Usually a pair of balances |
| Screwdriver | 1 Phillips or flathead | Retainers and take-out hardware |
| Safety equipment | 1 pair of gloves, eye protection | Protects against glass and spring parts |
| Work surface | 1 padded, level surface | Prevents sash twisting or impact |
| Replacement quantity | 2 balances for a double-sided sash | Keeps lift force even |
Step 1: Secure the work area
Remove blinds, curtains, screens, and nearby objects. Place a padded surface close to the window, and have another adult assist with a large or heavy sash.
Close the lower sash if the upper sash is the problem. Never leave a partially removed sash leaning against furniture.
Step 2: Remove the tilt-in sash
Raise the sash about 6 inches, slide both tilt latches inward, and tilt the top toward the room to approximately 90 degrees. Lift the sash straight upward only when both pivot bars are visibly released from their shoes.
Success checkpoint: The sash rests securely on the padded surface with no balance cord or spring under tension.
Common mistake: Tilting before both latches release can bend the pivot hardware or crack the frame.
Step 3: Release the balance mechanism
Inspect the jamb for a top screw, retaining clip, take-out notch, or plastic cover. Follow the window manufacturer’s release design rather than forcing the channel downward.
For a constant-force shoe, the metal cam may need to rotate to its unlocked position before the shoe can move to the jamb cutout. For a block-and-tackle balance, remove the retainer and release the cord terminal only after the sash is safely supported.
Success checkpoint: The old balance is free without gouging the vinyl jamb or pulling out an anchor.
Common mistake: Removing a retaining screw while the balance is loaded can allow the channel or shoe to move suddenly.
Step 4: Record the old balance details
Photograph both sides of the mechanism. Record the manufacturer mark, stamped number, channel length, channel width, shoe shape, cord-terminal style, and hand orientation.
Measure the metal channel itself, not the exposed spring or a nearby jamb liner. If the code is missing, weigh the sash and provide the supplier with photographs and dimensions.
Success checkpoint: A parts supplier can identify the replacement from your measurements and images.
Common mistake: Ordering by window width alone. Window width does not specify balance capacity.
Step 5: Install the replacement pair
Install the new left and right balances in the same orientation as the originals. Secure the upper anchor, place the shoes at the correct access position, and confirm that the cams face the direction required for pivot-bar entry.
Success checkpoint: Both shoes sit at matching heights and move smoothly without scraping.
Common mistake: Installing one balance backward or mixing old and new ratings.
Step 6: Reinstall and test the sash
Set both pivot bars into the shoes while the sash remains near 90 degrees. Tilt the sash upright until the latches engage, then raise and lower it slowly several times.
Success checkpoint: The sash stays open at several positions, locks evenly, and does not rise forcefully.
Common mistake: Testing with one pivot bar partially seated. That condition can twist the sash and damage the shoe.
How Do You Order the Correct Balance?
Order by the balance’s complete identity, not by a generic description such as “vinyl window spring.” The correct part matches the window brand or balance manufacturer, mechanism type, channel dimensions, shoe design, weight code, and side orientation.
| Identification detail | What to record | Typical example | Why suppliers need it |
|---|---|---|---|
| Balance design | Spiral, constant-force, block-and-tackle | Block-and-tackle | Determines mechanism family |
| Channel length | Metal channel only | 28 inches | Distinguishes replacement size |
| Marking | Stamp, code, or label | 2830 or 30C | May identify length or rating |
| Shoe design | Color, shape, cam style | Black pivot shoe | Determines sash connection |
| Sash load | Actual sash weight | 22 pounds | Sets spring capacity |
| Handing | Left or right position | Left jamb | Prevents reversed installation |
Take photos with a ruler beside the part. Record whether the window is single-hung or double-hung, whether it tilts inward, and whether the sash has one or two pivot bars.
A supplier may ask for the sash weight, not the full window weight. Remove screens, hardware, and loose accessories before weighing, because extra mass can lead to an overpowered replacement.
What Does Window Balance Repair Cost in the USA?
Typical USA DIY balance parts cost $15-$40 per window, professional balance repair costs $125-$250, and full window replacement commonly costs $600-$1,200 per opening. Prices vary with access, brand, sash size, local labor rates, and whether the repair requires custom hardware.
| Repair choice | Typical USA cost | Typical time | Best use case |
|---|---|---|---|
| Spiral balance adjustment | $0-$25 DIY | 15-30 minutes | Intact rod and recoverable tension |
| DIY balance pair | $15-$40 | 20-40 minutes | Standard tilt-in sash |
| Professional balance repair | $125-$250 | 45-90 minutes | Correct diagnosis and installation |
| Historic sash re-cording | $150-$400 | 1-3 hours | Wood window with accessible pockets |
| Full window replacement | $600-$1,200 | 2-6 hours | Damaged frame, glass, or severe deterioration |
A service call may exceed the part price because the technician’s cost includes travel, diagnosis, labor, disposal, and warranty administration. Ask whether the quoted price covers both balances, pivot hardware, and any return visit.
Do not replace the entire window solely because a balance failed. Full replacement becomes more reasonable when the frame is rotten, the sash is warped, the insulated glass has failed, air leakage is severe, or compatible hardware is unavailable.
What Changes for Wood, Aluminum, and Upper Sashes?
Wood windows with sash weights require cord or chain repair, aluminum windows often use spiral balances, and upper sashes can use separate balances from the lower sash. Frame material narrows the diagnosis but does not identify the mechanism by itself.
| Situation | Common mechanism | Special risk | Appropriate first action |
|---|---|---|---|
| Historic wood double-hung | Cord and cast-iron weight | Falling sash and exposed glass | Secure sash, inspect cord pockets |
| Older aluminum window | Spiral balance | Spring recoil and corrosion | Identify rod and shoe |
| Modern vinyl tilt-in | Constant-force or block-and-tackle | Pivot shoe disengagement | Remove sash using manufacturer method |
| Non-tilt single-hung | Channel or spiral balance | Difficult sash access | Use take-out clips or a technician |
| Upper sash failure | Dedicated upper balances | Hidden support failure | Compare upper and lower hardware |
Wood sash windows
A broken sash cord requires access to the weight pocket behind the removable stop. The sash should be secured before the stop is removed, because one remaining cord may not support the full load.
Use sash cord sized for the window and route it over the pulley without sharp bends. Historic preservation often favors repairing the original weight system rather than installing a modern spring balance that changes the window’s operation.
Aluminum and non-tilt windows
Non-tilt windows may not release through top tilt latches. A hidden take-out clip, removable jamb liner, or manufacturer-specific retainer may control sash removal.
Do not pry the sash out of the frame. Aluminum tracks bend easily, and a bent jamb can create continuing friction after the balance is replaced.
Common Mistakes and How to Fix Them
Several repair errors create a second failure even when the replacement balance is correct. The most damaging mistakes involve incorrect ratings, uneven installation, unsupported sashes, and forced release of loaded hardware.
- Replacing only one side: Replacing one side can leave uneven lifting force and make the sash twist. Replace both sides when the balances are the same age, unless the manufacturer specifies a single-side repair.
- Guessing from the window size: A 30-inch window can contain different sash weights and balance codes. Weigh the sash or provide the old code and dimensions.
- Using the wrong lubricant: Petroleum grease attracts grit and can contaminate shoes. Clean the track and use a compatible dry or silicone product only where the manufacturer permits it.
- Forcing a stuck shoe: A locked cam may need rotation before movement. If the shoe will not release, stop and identify the take-out design.
- Using pliers on a spiral balance: Pliers can slip from the rod and release stored energy. Use the correct tension tool and support the sash.
- Ignoring a pivot-bar defect: A new balance cannot compensate for a pivot bar that is bent, stripped, or not seated in the shoe. Replace the damaged connection first.
Safety and temporary protection
Keep the window closed until repair if the sash can fall. A temporary prop can prevent closure, but it is not a substitute for a secured mechanical repair, especially in a child’s bedroom or over a walkway.
Do not drill through a loaded balance, cut a spring, or remove a historic sash stop without understanding the weight system. Call a window-repair professional when the sash is oversized, the glass is cracked, the frame is rotten, or the mechanism is concealed behind finished trim.
Which Repair Choice Fits Your Situation?
The best repair depends on the mechanism, access, sash condition, and tolerance for risk. A matched balance replacement suits most modern vinyl windows, while historic wood windows usually deserve cord repair and severely damaged units may require replacement.
| Homeowner situation | Recommended action | Expected cost | Avoid |
|---|---|---|---|
| Modern tilt-in vinyl, intact sash | Replace matched balance pair | $15-$250 | Replacing whole window |
| Spiral balance with mild tension loss | Adjust with proper tool | $0-$25 | Pliers or excessive winding |
| Historic wood, sound frame | Re-cord sash weights | $150-$400 | Unplanned vinyl conversion |
| Cracked or rotten frame | Obtain replacement estimate | $600-$1,200 | Repeated balance repairs |
| Heavy triple-glazed sash | Use technician or manufacturer part | $125-$300 typical repair | Generic spring substitution |
A rental property manager should photograph the balance code and standardize parts by window series. That approach reduces repeat service calls when several units use the same jamb hardware.
A preservation-minded homeowner should retain functioning sash weights where the wood frame and pulley pockets remain sound. A modern replacement balance may lower repair frequency in some cases, but it can reduce historic authenticity and complicate future maintenance.
FAQ
Can I keep a window open with a stick?
A stick can temporarily prop up a sash, but it does not repair the failed balance or prevent the sash from shifting sideways. Use a temporary prop only while arranging repair, keep people away from the opening, and do not rely on it in a child-accessible room.
Why will my window stay up only when it is almost closed?
A sash that stays up near the sill but falls when opened wider often has a weak balance, incorrect spring rating, or excessive load from replacement glass. Balance force changes through the travel path, so test the sash at several positions and inspect the code before ordering parts.
Why is my window hard to open but does not fall?
Hard operation without downward drift usually points to dirty jambs, swollen wood, damaged weatherstripping, a bent track, or a lock that remains partially engaged. Clean and inspect the travel path first, because installing a stronger balance can make the window rise dangerously fast.
Can I replace a window balance without removing the sash?
Some non-tilt designs permit balance access through take-out clips or jamb openings, but most tilt-in systems are safer to service with the sash removed. The correct method depends on the manufacturer and balance style, so do not force a channel through a narrow opening.
Why won’t my top sash stay up?
A top sash can fall when its upper balances fail, its pivot hardware disengages, or the upper sash was reinstalled incorrectly after cleaning. Check whether the upper sash has separate balance channels, then compare its hardware with the lower sash before assuming both systems use the same part.
The Bottom Line
Why won’t my window stay up? In most USA homes, a failed window balance is the primary cause, but a pivot bar, balance shoe, jamb track, sash cord, or frame can produce the same symptom. Identify the mechanism, inspect both sides, match the replacement to the sash weight and hardware code, and keep the opening secured until the sash holds safely at multiple positions.