Why Is My Hardwood Floor Cupping? Find the Moisture
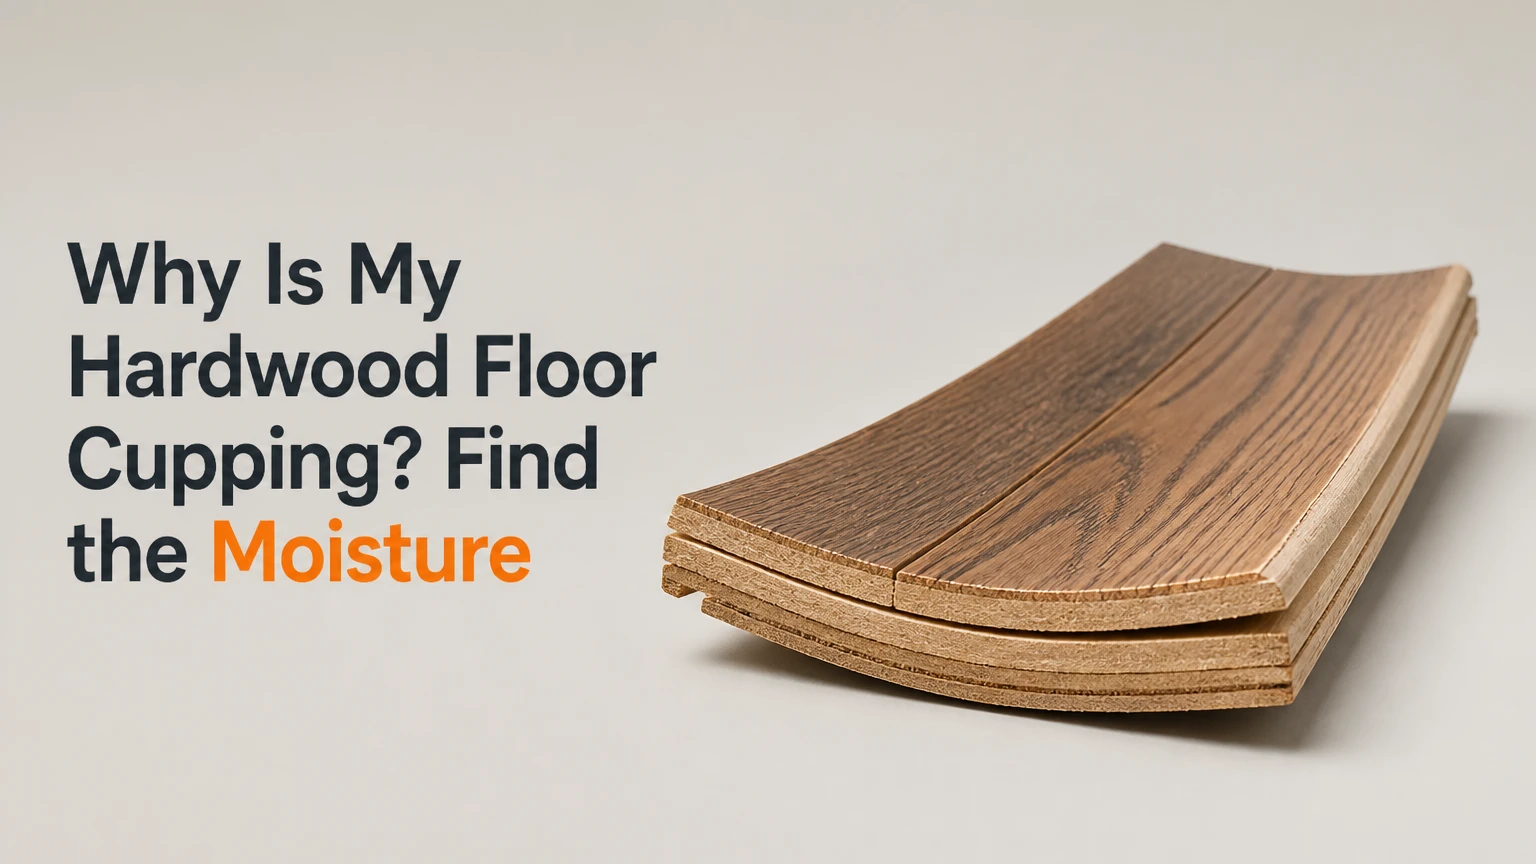
Hardwood floor cupping happens when moisture creates an uneven moisture gradient between the top and bottom of a wood plank, causing its edges to rise above the center. The most common sources are a damp crawlspace, wet concrete slab, plumbing leak, spill, or sustained indoor humidity. The floor must dry and stabilize before sanding or replacement decisions.
Key Facts at a Glance
- Hardwood floor cupping means the plank edges are higher than the center across its width.
- Moisture from below commonly causes cupping, especially over crawlspaces, basements, and concrete slabs.
- A sudden spill or appliance leak usually produces localized cupping, while humidity or subfloor moisture affects broader areas.
- Minor cupping can flatten after controlled drying, but compression-set wood may remain permanently distorted.
- Do not sand an actively wet or changing floor because premature sanding can create permanent crowning.
- A practical indoor target for many hardwood floors is 30%-50% relative humidity at approximately 60-80°F, subject to the flooring manufacturer’s requirements.
What Does Hardwood Floor Cupping Look Like?
Hardwood floor cupping is a concave distortion across the width of an individual board: both long edges sit higher than the board’s center. A hand sliding across the plank may feel a shallow trough, and light reflecting across the finish often reveals repeated waves along several boards.
Cupping is different from buckling, where boards lift dramatically from the subfloor, and different from crowning, where the center rises higher than the edges. Peaking describes boards lifting along their side joints, often because expansion pressure has concentrated at a seam.
| Distortion | Visual profile | Typical moisture pattern | Immediate concern |
|---|---|---|---|
| Cupping | Edges high, center low | Moisture imbalance across board width | Hidden water or humidity |
| Crowning | Center high, edges low | Uneven drying or premature sanding | Permanent surface loss |
| Buckling | Large sections lifted | Severe water exposure or expansion | Trip and structural hazards |
| Peaking | Joint or board ridge raised | Compression at tight seams | Installation restraint |
The visible shape does not identify the moisture source by itself. A moisture inspection must compare the floor surface, subfloor, room humidity, and area below the flooring.
Why Is My Hardwood Floor Cupping?
The mechanism is a moisture imbalance across the plank, followed by expansion across the wood grain. Wood expands much more across its width than along its length, so moisture entering one face changes the board’s shape before the opposite face can equalize.
The USDA Forest Products Laboratory summarizes the underlying property simply: “Wood is a hygroscopic material.” That means wood exchanges moisture with surrounding air until it approaches an equilibrium moisture content, or EMC. When the underside, top surface, or one board edge changes moisture faster than the rest, the plank bends.
How does moisture create a permanent curve?
Moisture makes the affected wood fibers swell. If neighboring boards and fasteners leave insufficient room for that movement, the boards press against one another and the cells can suffer a compression set. After drying, the damaged cells may not recover, so the edges remain elevated.
The sequence usually follows four stages:
- Moisture enters: Water vapor, liquid water, or humid air reaches one face of the plank.
- The board swells: Expansion occurs primarily across the grain.
- Movement becomes restrained: Tongue-and-groove joints, adhesive, nails, walls, or cabinets limit expansion.
- The board dries unevenly: The original shape may return, or permanent cupping may remain.
A floor can therefore look drier while retaining damage. Surface dryness is not proof that the wood has stabilized.
Is the Moisture Coming From Below?
Moisture from below is a leading cause when cupping affects a broad area, follows the floor’s direction, or appears above a crawlspace, basement, or slab. Check the underside before assuming that indoor humidity or cleaning caused the defect.
| Building condition | Specific inspection point | Typical finding | Likely remedy |
|---|---|---|---|
| Crawlspace | Soil, insulation, piers, plumbing | Damp soil or missing ground cover | Ground vapor barrier and drainage repair |
| Basement | Concrete, masonry, utility lines | Wall seepage or pipe condensation | Leak repair and dehumidification |
| Concrete slab | Slab moisture test and perimeter | Vapor transmission or high slab RH | Moisture mitigation and flooring evaluation |
| Raised wood subfloor | Joists and subfloor underside | Wet insulation or plumbing leak | Plumbing repair and controlled drying |
Crawlspaces deserve special attention because ground moisture can raise humidity for months without visible standing water. A sealed vapor barrier, functioning drainage, and adequate ventilation or conditioning may be needed, depending on the building design and local code.
Concrete slabs can cause cupping even when the room appears dry. A slab may release moisture after installation, seasonal rain, plumbing events, or changes in groundwater conditions. A flooring professional should use a recognized concrete relative-humidity test, such as ASTM F2170, when slab moisture is suspected.
Could Indoor Humidity or a Spill Cause Cupping?
Indoor humidity can cause seasonal cupping when moist summer air raises the floor’s equilibrium moisture content, while a spill or appliance leak usually creates a concentrated pattern. The size and shape of the damaged area provide useful clues, but moisture readings confirm the diagnosis.
A dishwasher, refrigerator supply line, washing machine, toilet, exterior door, or overflowing plant pot can send water into board joints. Top-down water may travel beneath the finish and spread farther than the original visible spill.
| Pattern on the floor | Most likely source | Confirming clue | Urgency |
|---|---|---|---|
| One to four boards near appliance | Supply hose or drain leak | Damp cabinet base or toe-kick | Same day |
| Broad room-wide cupping | High RH or subfloor moisture | RH above 55% or damp underside | Within 24-48 hours |
| Cupping near exterior wall | Rain intrusion or foundation seepage | Stained drywall or wet sill | Same day |
| Seasonal whole-floor change | Indoor humidity cycle | Shape improves in dry winter | Monitor and control RH |
| Narrow path over a pipe | Plumbing leak | Thermal or moisture anomaly | Same day |
HVAC operation can also create uneven conditions. A room with poor air circulation, a closed supply register, or a malfunctioning dehumidifier may remain humid while the rest of the house stays within range.
How Should I Test the Floor?
Test relative humidity first, then measure flooring and subfloor moisture with a suitable meter. A single reading is inadequate because cupping is caused by a gradient and changing conditions, not by one universal moisture number.
Use a digital hygrometer in the affected room and record readings morning and evening for several days. A pin or pinless wood moisture meter can identify patterns, but meters require species settings, calibration, and reasonable contact with the material.
| Test | What it measures | Useful homeowner action | Professional limitation |
|---|---|---|---|
| Digital hygrometer | Room relative humidity | Record RH for 3-7 days | Does not measure wood or slab |
| Wood moisture meter | Approximate wood MC | Compare cupped and unaffected areas | Species, finish, and depth affect readings |
| Probe comparison | Surface or edge gradient | Identify wetter zones | Requires careful access and interpretation |
| ASTM F2170 test | Internal slab RH | Assess concrete before flooring work | Usually requires trained testing |
| Crawlspace inspection | Visible moisture conditions | Check soil, insulation, and leaks | Hidden leakage may require instruments |
Many hardwood floors fall near 6%-9% moisture content in stable interior conditions, but species, geographic region, product construction, and manufacturer instructions change the acceptable target. The familiar 4% flooring-to-subfloor difference for narrow strip flooring and 2% for wider solid boards are useful installation benchmarks, not universal repair rules.
A professional should compare readings with the flooring manufacturer’s installation requirements and the local seasonal EMC. Do not cut test holes in finished flooring without a repair plan.
What Should I Do First?
Stop adding moisture, locate the source, and stabilize the environment before altering the wood. The first response is source control and documentation, not sanding, aggressive heating, or forcing boards flat.
- Stop the water source. Shut off a leaking appliance or plumbing line, and repair roof, wall, or foundation entry.
- Remove surface water. Blot standing water with towels or a suitable extraction machine; avoid saturating the wood with additional cleaning water.
- Document the condition. Photograph the floor, record dates, mark affected boundaries, and save leak-repair invoices for insurance or contractor evaluation.
- Measure room RH. Place hygrometers in the affected room and nearby unaffected rooms.
- Dry gradually. Use HVAC, fans, and a dehumidifier without directing intense heat at the boards.
- Inspect below. Check the crawlspace, basement, slab perimeter, cabinets, and utility penetrations.
- Recheck weekly. Record moisture readings and whether the profile is improving, stable, or worsening.
Controlled drying commonly takes several weeks, and deeper subfloor moisture may require one to six months to reach stable conditions. A floor that changes shape during drying is not ready for sanding.
Will Cupping Go Away After Drying?
Minor hardwood floor cupping can flatten after the moisture source is corrected and the boards reach stable moisture content. Cupping is less likely to disappear when the wood has developed a compression set, the finish has cracked, boards have separated, or severe swelling has damaged the joints.
| Condition after drying | Expected outcome | Typical observation period | Next decision |
|---|---|---|---|
| Slight edge lift, no cracks | Often improves | 2-8 weeks | Continue monitoring |
| Moderate cupping, stable joints | May partially recover | 1-3 months | Reassess moisture gradient |
| Severe cupping with crushed edges | Usually incomplete recovery | 1-6 months | Consider replacement |
| Finish failure and black staining | Surface or biological damage possible | Immediate inspection | Test and repair affected area |
| Boards lifted from subfloor | Limited self-correction | Do not wait | Professional assessment |
Drying too fast can create new stresses, finish checking, or splits. Whole-house humidity control is usually safer than placing a high-temperature heater directly on the floor.
When is sanding safe?
Sanding is safe only after the source is repaired, the floor and subfloor have stabilized, and moisture readings remain consistent over time. The flooring contractor should confirm that enough wear layer remains and that the boards are no longer actively changing shape.
Sanding a wet, cupped floor removes the raised edges while they are still elevated. If the edges later flatten, the sanded boards can become lower at their sides, producing crowning or visible valleys. That error cannot be repaired by applying another finish coat.
Is It Cupping, Crowning, or Buckling?
Cupping has raised edges, crowning has a raised center, and buckling lifts larger sections from the subfloor. Correctly naming the distortion matters because crowning can result from previous sanding, while buckling indicates greater expansion pressure and a higher immediate hazard.
| Condition | Hand-feel test | Common cause | Repair implication |
|---|---|---|---|
| Cupping | Trough in board center | Moisture imbalance | Dry and stabilize first |
| Crowning | Ridge along board center | Uneven drying or sanding | Inspect board thickness |
| Buckling | Section moves or lifts | Severe water and restraint | Remove pressure and assess subfloor |
| Peaking | Ridge at board joints | Expansion pressure | Inspect perimeter gaps and joints |
If the floor is unsafe to walk on, boards are pulling away from fasteners, or moisture remains high, keep people away from the area and call a flooring or water-damage professional.
Does Solid Hardwood Cup More Than Engineered Wood?
Solid hardwood generally moves more across its width than engineered hardwood because engineered planks use cross-oriented layers that reduce dimensional movement. Engineered wood can still cup when moisture reaches its core, the veneer is unbalanced, the adhesive fails, or the subfloor remains wet.
| Flooring type | Typical construction | Moisture sensitivity | Common repair limit |
|---|---|---|---|
| Solid strip | One wood species, 0.75-inch nominal thickness | High across width | May allow multiple refinishes |
| Solid wide plank | One thick wood layer, often 5-10 inches wide | Higher movement per board | Requires stricter moisture control |
| Engineered plank | Cross-layer plywood or veneer core | Lower movement, still moisture-sensitive | Veneer thickness limits sanding |
| Floating engineered floor | Engineered boards over underlayment | Moisture can affect joints and core | Replace damaged click joints |
Engineered construction reduces movement; it does not make wood waterproof. A wet slab, leaking dishwasher, or high crawlspace humidity can damage engineered flooring faster at seams and edges than a homeowner expects.
What Indoor Conditions Prevent Cupping?
Maintain a stable indoor environment near 30%-50% RH and 60-80°F, while following the flooring manufacturer’s narrower requirements when provided. Stability matters because repeated humidity swings force wood to absorb and release moisture even when no liquid leak exists.
| Control measure | Target or interval | Why it matters | Warning sign |
|---|---|---|---|
| Indoor RH | 30%-50% | Limits seasonal wood movement | Sustained RH above 55% |
| Temperature | 60-80°F | Supports predictable EMC | Cold, damp perimeter |
| Hygrometer checks | Weekly in humid seasons | Reveals drift early | RH changes over 10 points |
| Dehumidifier drainage | Continuous or daily emptying | Prevents tank overflow | Full tank or condensation |
| Wet cleaning | Lightly damp microfiber | Limits seam saturation | Visible liquid film |
Use a dehumidifier sized for the room and climate, keep air moving, and inspect condensate lines. Do not attempt to solve a foundation leak by operating a dehumidifier indefinitely; the machine controls symptoms while the building continues supplying moisture.
What Does Hardwood Floor Repair Cost in the USA?
Typical USA repair costs range from roughly $250 for basic moisture diagnosis to more than $10,000 for extensive replacement, depending on area, access, flooring type, and the moisture source. Local labor markets, demolition, furniture moving, subfloor replacement, and finish selection can change the final price substantially.
| Repair option | Typical USA cost | Typical duration | Best condition |
|---|---|---|---|
| Hygrometer and basic homeowner drying | $30-$400 | 2-12 weeks | Slight, recent cupping |
| Professional moisture inspection | $250-$750 | 1-3 hours | Unknown or recurring source |
| Crawlspace moisture correction | $1,500-$8,000 | 1-5 days | Damp soil or missing barrier |
| Sand and refinish | $4-$8 per sq. ft. | 3-7 days | Stable boards with usable wear layer |
| Partial board replacement | $8-$20 per sq. ft. | 2-7 days | Localized permanent damage |
| Full replacement | $10-$25 per sq. ft. | 5-14 days | Severe or widespread failure |
These are typical planning ranges, not quotes. Moisture mitigation may cost more than the flooring repair, but skipping that work often causes the defect to return during the next humid season.
Should I Refinish, Replace, or Repair the Floor?
Refinish a stabilized floor when the boards remain structurally sound and retain adequate wear thickness; replace boards when distortion, staining, delamination, or crushed joints prevents a flat repair. Replacement is appropriate for widespread recurring moisture when the building condition cannot be corrected.
| Decision | Suitable when | Cost pattern | Main risk |
|---|---|---|---|
| Dry and monitor | Cupping is mild and improving | Lowest initial cost | Waiting with an active leak |
| Partial repair | Damage follows one leak zone | Medium localized cost | New boards may color-match poorly |
| Refinish | Stable solid wood has thickness | $4-$8 per sq. ft. | Sanding before stabilization |
| Replace with solid wood | Moisture is corrected and design requires it | $10-$25 per sq. ft. | Repeating installation errors |
| Replace with engineered wood | Movement reduction is valuable | $8-$20 per sq. ft. | Assuming engineered means waterproof |
A flooring contractor should inspect board thickness, fastening, perimeter expansion gaps, subfloor flatness, and moisture readings before quoting a sanding job. A low repair price is not economical if it leaves the moisture source untouched.
Common Mistakes and How to Fix Them
Homeowners often worsen cupping by treating the visible shape rather than the moisture system beneath it. The safest correction is to stop the mistake, restore stable conditions, and reassess before applying mechanical force.
- Sanding immediately: Stop work and allow stabilization; reassess with repeated moisture readings.
- Using intense heat: Remove the heater and dry with controlled room conditions to reduce splitting.
- Running a dehumidifier without fixing a leak: Repair plumbing, drainage, or vapor entry first.
- Wet-mopping the floor: Use a nearly dry microfiber mop and a manufacturer-approved cleaner.
- Closing expansion gaps with trim: Inspect perimeter restraint instead of hiding pressure.
- Replacing boards before drying the subfloor: Verify the subfloor condition before installing new material.
A counterintuitive field rule is that a floor can look flatter while still carrying dangerous subfloor moisture. Visual improvement is encouraging, but stable readings and a repaired source determine readiness.
When Should You Call a Professional?
Call a professional when cupping covers more than one room, returns after drying, follows a concrete slab, includes mold-like odor or dark staining, or appears beside plumbing. A qualified inspector can separate flooring failure from building-envelope failure and prevent an unnecessary replacement.
Ask the contractor for:
- Moisture readings from flooring and subfloor.
- The meter type, species setting, and test locations.
- A written moisture-source diagnosis.
- Evidence that the slab or crawlspace meets installation requirements.
- A repair sequence that places drying before sanding.
- Separate prices for source correction, flooring repair, and replacement.
- The remaining wear-layer thickness before refinishing.
For insurance claims, preserve photographs, dates, damaged-material samples, plumber reports, and drying records. Insurance coverage depends on the policy and cause, so documentation does not guarantee payment.
The Bottom Line
Why is my hardwood floor cupping? The answer is usually a moisture imbalance, not a finish defect: water or humid air has changed one side of the plank faster than the other. Check for leaks, crawlspace or slab moisture, indoor RH above 50%-55%, and installation-related restraint before choosing a repair.
Dry the building gradually, monitor the floor and subfloor, and wait until readings stabilize. Minor cupping may reverse, while compression-set boards, delamination, severe buckling, or repeated moisture exposure may require partial or full replacement. Never sand an actively cupping floor.
Frequently Asked Questions
Can a wet mop cause hardwood floor cupping?
A wet mop can contribute to localized cupping when excess water enters plank joints or remains on the surface. Occasional cleaning with a lightly damp microfiber mop is usually different from flooding the floor, but repeated wet cleaning can raise moisture content near seams, especially where finish is worn or boards are unfinished.
Why is only one room’s hardwood floor cupping?
One-room cupping usually indicates a localized condition, such as an appliance leak, closed HVAC supply, exterior-wall intrusion, or crawlspace moisture beneath that room. Compare RH and floor readings with an unaffected room, then inspect cabinets, plumbing, thresholds, and the underside of the affected area.
Can hardwood floor cupping happen in winter?
Winter cupping can occur when a plumbing leak, wet basement, humidifier, or melting snow introduces moisture. Seasonal cupping more commonly appears during humid weather, but indoor humidity patterns and building leaks determine the result. A winter floor that cups near an exterior wall deserves a moisture-intrusion inspection.
Does painting or sealing a crawlspace stop floor cupping?
Painting a crawlspace wall alone rarely stops cupping because it may not control ground vapor, drainage, plumbing leaks, or slab moisture. A complete solution may require a sealed ground vapor barrier, drainage correction, insulation changes, conditioned air, and repairs that match local building-code requirements.
How long should I wait before refinishing a cupped floor?
Wait until the moisture source is corrected and flooring and subfloor readings remain stable, commonly for several weeks or longer after significant water exposure. A contractor should confirm the floor is no longer changing and that the boards retain enough thickness for sanding before refinishing begins.
Is cupping covered by homeowners insurance?
Homeowners insurance may cover sudden accidental water damage, such as a burst supply line, but policies often exclude gradual seepage, maintenance failures, flooding, or installation defects. Report eligible damage promptly, document the source and drying response, and ask the insurer for a written coverage determination.